Wednesday, August 31, 2011

september challenge on my blog!

Hi everyone,

I decided to have a september challenge on my blog.
It´s simple just crochet anyone of my patterns and post the result on my blog!
You can win 2 free patterns of your choice from my shop! I have lots of fun halloween patterns available!
So what are you all waiting for? Don´t have any of my patterns? Don´t worry, I have lots of them for free, just click here.

For all of the details visit my blog!


Tuesday, August 30, 2011

Monday, August 29, 2011

Shop of the Week: GingerDead.etsy.com

The store's name comes from Calan's comic GingerDead and Friends. The comic characters can be found on many of the greeting cards and comic prints.
The art jewelry features original illustrations drawn in pen and ink on hand formed polymer clay and is in a similar vein as Calan's comic art. Some of the jewelry is hand sculpted in stone clay and painted in acrylics. The art dolls are usually made from clays and mixed media such as found objects and natural elements picked up at local beaches. Other than the cards and prints the things you'll find here are one of a kind and handmade by the artist.

♦♦♦♦    ♦♦♦♦    ♦♦♦♦    ♦♦♦♦

Etsy
Buy Handmade
GingerDead

Friday, August 26, 2011

Costume Ideas for the Seamstress in all of Us

EDT's Countdown To Halloween!

Thinking about Halloween costumes yet? You should be! Here's a couple patterns I, Static White, just listed with some suggestions to help you along.

Morpheus & Neo in Matrix Reloaded-
Neo's coat in the first movie was more a western style duster with a regular collar & 'V' insets on the shoulders. Morpheus' coat, if you want to be as accurate as possible, should be done in a black alligator skin-looking vinyl. But, that can be mighty pricey so you may just opt for a nice black vinyl.
The pattern suggests velcro closures. Bleh. If you prefer buttons, like I do, here's excellent instruction on how to do so here.


Sherlock Holmes, Van Helsing, Full Metal Alchemist, Uryƫ Ishida- My hubby thinks the coat on the left (blue) looks Van Helsing but it would need some tweaking with lots of buckles, straps, top stitching galore and the back reshaped and topstitched. If you want to get as close as possible to the movie costume, anyway! I think it would be an excellent beginning to a coat for an Uryƫ Ishida costume, from the anime Bleach, personally. It would also be a good start for a Full Metal Alchemist (another anime) military outfit.The coat on the right is obviously a Sherlock Holmes style. The pattern even includes the sleuth cap. But if you're good at playing with patterns it could be turned into an Alucard, of the Hellsing anime, coat by shortening and attaching the front edges of the cape to sleeves inner seam rather than have it come all the way to the center front.


Victorian travel/driving coats, Interview with a Vampire, Steampunk, Doctor Who-

This pattern is a basic men's Victorian driving coat and it includes a pattern for your lady! We know how cold it get's in October here in NA so this would be perfect to throw over your Lestat, Louis or any other Vampire Chronicles character. Louis & Lestat wear something similar in the first movie, if you want to get picky. And, of course, there's the every popular steampunk stylings. Are you a time traveling mad doctor? A Jules Verne type of adventurer? Well then, you need a coat, don't you? Shorten the coat to the knee, make it out of brown wool with no top stitching and guess what you have? The coat for Tom Baker's Doctor Who, that's what!


Civil War, Victorian/Steampunk, Firefly- Here we have Civil War North & South uniforms. Confederate is on the left and Union is on the right. I can not say if these are historically accurate for reenactment but I'm betting they'd be a good place to start if you're wanting to make your own.
This pattern is Victorian era regardless and can be used to get you going on some nice steampunk outfits too. Also, if you lengthen the one on the right to about the knee, stitch it up in brown suede, add wide leather cuffs (or faux if you prefer), don't forget the splits at the side seams aka gun flaps, and guess what you made? A Firefly Browncoat! The previous Victorian driving coat is also a good basis for a Firefly Browncoat.


For more of Static White on the web you can find her at …
etsy.com/shop/SWStitchery
etsy.com/shop/staticwhite
facebook.com/SWStitchery
StaticWhite.Blogspot.com
twitter.com/swstitchery


Thursday, August 25, 2011

New design - Medical prints

A new design made specially for all of you mad scientists and medical geeks out there!
A set of 10 medical posters that will look splendid in any laboratory, asylum, hospital or medical office. They are real vintage medical drawings printed in parchment paper, for you to hang on the walls, frame or simply lay about. This set includes brains, skeletons, the circulatory system, the heart and muscles.
Only at Kaleidoskopic Romance!

Tuesday, August 23, 2011

Shop of the Week: Masque242.etsy.com

I'm an artist & fashion designer from Latvia, Europe. My designs are marked with MASQ-fashion sign.
I have been creating things from age I can barely remember myself..
I started to sew clothes for myself because I did not see "over the rack" type clothes interesting at the age of 11, for others at 16.. besides that I just like creating things around myself and colour them in my own way.
As for education - I have finished BURDA Riga clothing technology, modelling and construction professional program, so you can be sure that my creations are professionally made and will last.
In my free time I might be in some club spinning some good trad.goth, deathrock, darkwave, wave, synth, electro-punk and similar creepy tunes.

♦♦♦♦    ♦♦♦♦    ♦♦♦♦    ♦♦♦♦

Etsy
Buy Handmade
Masque242

Tuesday, August 16, 2011

Shop of the Week: CreepyStuff.etsy.com

I make creepy/cute art. Everything from handmade ouija boards to voodoo dolls to revamped monster shadowboxes.

♦♦♦♦    ♦♦♦♦    ♦♦♦♦    ♦♦♦♦

Etsy
Buy Handmade
CreepyStuff

Monday, August 15, 2011

Miniature Theme Trees available from 19th Day Miniatures!

I've had a blast making miniature theme trees recently and I keep churning out more while my supplies last.  They are too much fun to make!  Each one is completely unique and OOAK.  And on each new one I list in my store:
http://www.etsy.com/shop/tarayvonne there are easy payment plans available to make them more affordable for every budget.  Here's a few examples of what I've been making:

Dollhouse Miniature Alice in Wonderland Tree (sold)

Neil Gaiman's Coraline Themed Tree (currently available):


Harry Potter Gryffindor Common Room Themed tree (sold)

And finally what I'm currently making but not finished with, a vintage witch themed tree (sold already)-

There will be so much more done to this one (like an owl on the post) when I'm done. 
Please visit my store sometime :)
or my blog if you'd like to keep up on what will be available in the near future:


Friday, August 12, 2011

Elegant Halloween Party Invitations

EDT's Count Down To Halloween!
Halloween is almost here. And you have decided that you will throw a party that is going to be the talk of your whole neighborhood. You have picked your costume, your decorations, and the food you will be serving. Now it’s time to let your guests know so they can come. Oh my! You need to prepare the invitations!

Sure, you can go over to Martha Stewart’s web page, or to the craft store to buy some wonderfully awesome and creepy invitations… That most people will be using as well. Or, you can make your own and stand out of the crowd. This tutorial will be best suited for darkly elegant parties, with a hint of Victorian/past eras flair, more than for kid-oriented ones. We are striving for luxurious decadence and style.

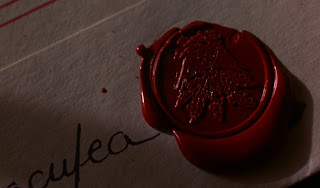
Do you remember Francis Ford Coppola’s movie “Bram Stoker’s Dracula”? While traveling by train, Jonathan Harker is reading a letter sent by the Count:


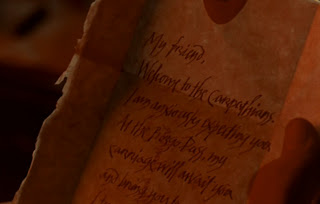
Our invitations are going to be similar to this letter.

Materials you will need:

Pic materials

- a computer and printer

- parchment paper

- scissors

- red sealing wax

- wax seal

- matches or lighter

First, buy the parchment paper. I love the Southword brand, and so did Abraham Lincoln! You have several available colors, but my favorite is gold. You can find it at most Staples stores. You’ll see that it has an amazing feeling to the touch, just like real hemp parchment. You won’t be using the whole lot for the set of invitations, but it’s an awesome paper to have for other projects (Harry Potter, anyone?) or to send letters.

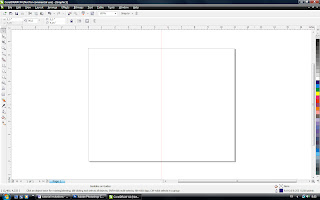
Go to your computer and open a program to work with text. My favorite to use is Corel Draw, especially because we may add graphics later on. Adobe Illustrator may work as well. If you use Corel:

* open a new document

* choose the option “Landscape”

* we will use one page to make two invitations, so mark it in a way that you know how much space you can use – draw a line dividing it by half.


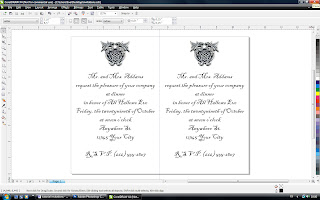
* Write your text. Try to use formal or semi-formal language, such as “You are cordially invited”, or “Mr and Mrs. (insert your last name) request the honor of your presence”. Don’t forget to include the date and place for the party. For the RSVP, I personally would include only a contact telephone. Telephones existed in the 19 century, but not e-mail, and we are going for antique feeling here. However, that is up to you.

* Choose a font that looks like hand writing. If you do not have one, just google “handwriting font” and you’ll find a bunch of them. I am very fond of Blackadder ITC. Adjust the size.

* Copy the text in the second half of the page. Click Arrange -> Align and distribute -> Align top.

* Center both texts to the page.

* Optional. You may want to add a crest or personal image to your invitations. A Celtic knot, a rampaging lion… Try not to use spiders, bats, ghosts or the typical Halloween imagery. We are going for the “Coat of Arms” look. As always, Google is your friend. Choose your image and save it as a JPG. Then click the Import button, and insert your image on the invitations. Adjust the image size and its position to the text.


* Click File -> Print. A picture should come up saying: “Printer paper orientation does not match one or more document pages. Adjust printer automatically?” Click Yes. Click Print. You may want to do it first on a regular paper just to make sure everything is correct. Print as many invitations as you need.

Cut the page in half following the line you made.

Fold it in a way that there is no text showing. I like the method 1 better, but the method 2 is the same as to how Jonathan’s letter is fold:


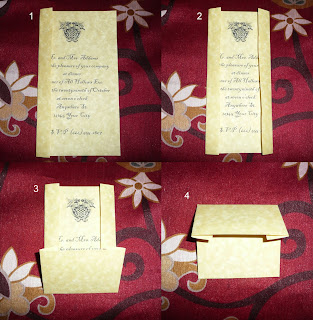
Then, get ready for the seals!


Next you will need sealing wax. You may buy it online, but they usually carry it at Michael’s stores in several colors (white, silver, gold…). My favorite is, of course, red, and goes perfectly well with this tutorial theme. To stamp the wax, you also need a wax seal. Also available at Michael’s, you have every letter of the alphabet to choose from, or you can pick a generic image. You have a wide selection of seals at Nostalgic Impressions.


*Disclaimer*

Be very careful during these steps! Be aware of risk of fire. Wax and papers can burn, and we would end up with a disaster instead of a nice party. Have someone nearby to help you, and a fire extinguisher just in case. Children should not use matches or lighters. You may want to try doing seals on regular paper a few times before doing it on your invitations.

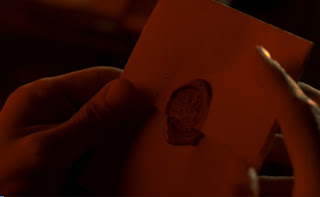
Light the wick of a sealing wax stick and let the melting wax drip over your closed invitation. Be patient. It can take a little while for a good amount of wax to form on the paper. Blow out the flame when you have enough wax on your invitation, and put the stick aside on a non-flammable surface. Let the wax cool for a few seconds and stamp it with the wax seal. Wait 2-3 seconds before lifting it up. Let it cool. Repeat these steps for each invitation, one at a time.


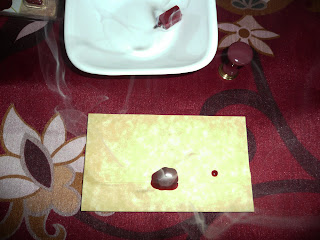
You can see a drip fell out of place, but personally it does not bother me; I honestly think that this add to the character of the invitation. Extra drops were likely to happen in antique documents. However, you just need to be extra careful when blowing out the flame on the wax stick or when you handle it to avoid this.

Optional. If you would rather not use fire, there are available stickers that look like wax seals. You can buy those instead, but be advised that these tend to be more expensive.

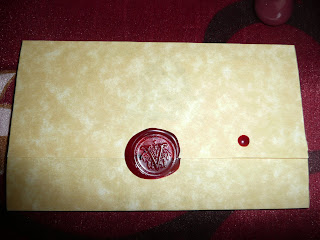
Deliver proudly your invitations and watch the surprised face of your guests. Surely they have never received such an invitation! You may do it in person, or use the also available parchment envelopes. If using the envelopes, place your wax seal outside, sealing the letter, instead of on the invitation.

Have fun at your party!

Kaleidoskopic Romance is a team of husband and wife and this is our little art project. We have always been fascinated with all things macabre, dark and unusual, especially Romantic Era writers as well as vampires and other night hounds. What we like most is to take an ordinary object and “gothificate” it.

For more of kaleidoskopicromance you can find them at...
Shop: kaleidoskopicromance.etsy.com
Blog: kaleidoskopicromance.blogspot.com

New Apothecary cabinet

New apothecary cabinet up for sale!
Filled to suit your medicinal needs, with real glass bottles and authentic reproductions of vintage apothecary labels.
Grab it today at Kaleidoskopic Romance!

Monday, August 8, 2011

Shop of the Week: PillboxDesigns.etsy.com

Born from two mad native Angelinos, PillBoxDesigns took form in 2008. Initially creating a variety of mural size vinyl art decals, we soon began exploring other methods of producing our art. Heavily influenced by the vintage flair of yesteryear, Horror and Cult Movies, femme fatal and cheeky art, we have expanded our product line to what you see today. Laptop Decals, Vinyl Art Clock Kits, Dry Erase Aluminum Signs and of course our moderate to mural size Vinyl Wall Decals. All creations are done "in house" by our own hands from production to packaging.
From the mildly macabre to decidedly sexy, our vinyl wall art will provoke your imagination, taking your home or office into another realm of reality.

♦♦♦♦    ♦♦♦♦    ♦♦♦♦    ♦♦♦♦

Etsy
Buy Handmade
PillboxDesigns

Clowns...

They're available on Etsy...


Sunday, August 7, 2011

Halloweenie Giveaways at Raven Fae's Creations

Raven Fae's Creations will be hosting weekly Halloween Giveaways starting Monday, August 8th with the last on October 3rd. Some of the items being offered are from Yankee Candle, Bath and Body Works, and Bethany Lowe Designs, just to name a few! Don't miss out on this wickedly wonderful celebration of the most spooktacular time of year!!


Head on over to Raven Fae's Creations blog for all the details!

Monday, August 1, 2011

August Headbands

I'm baaaack with more headbands!

I've been busy and forgot to post the batch of headbands I did in July (most of those are gone now anyway, hurray!) but here's some of August's...

L to R:
Cherry Bombs at Midnight <--last one!, Haunted Carnival (big square), Rusted Gold
Flashlights in the Boneyard, Naughty & Nice, Rue Dreadful


Also today is your last chance for my 25% off sale section. So check it out before you miss out!

xx ~Static

Shop of the Week: SauvageRavenCreation.etsy.com

In August 2006 I locked myself into the laboratory and when I emerged, my creatures were born. My minions have had many transformations since then and are still evolving.
I am interested in all things dark & spooky. Needless to say my favorite Holiday (besides Christmas) is Halloween and is reflected in most of my creations.
I am a great fan of Mr. Poe & more often than not there will be at least one item here with a touch of the master.

♦♦♦♦    ♦♦♦♦    ♦♦♦♦    ♦♦♦♦

Etsy
Buy Handmade
SauvageRavenCreation