Showing posts with label halloween diy. Show all posts

Tuesday, September 25, 2012

Costume: A Silhouette

EDT's Count Down To Halloween!

The lovely and talented ForeverFall has come up with yet another amazing costume idea for all you darklings out there. Why not go as an old fashioned silhouette. Yes that’s right the classic black shape that has lined walls of homes for centuries. Here is how Miss ForeverFall would go about it…

Costume: A Silhouette 
What you will need: 
- Black wig 
-Black face paint or just a simple black mask 
-Black clothes 
-Be sure to wear either a black turtle neck, or a high-necked   blouse to cover most of your neck. 
-Black gloves, either satin or leather 

Getting dressed is pretty self-explanatory. If you choose to use Halloween make-up rather than wear a black mask, simply paint your face and the part of your neck that is exposed outside of your collar. When you paint with black around your eyes, be sure that you have make-up that is okay to use around your eyes. If it is not, you can use black eyeliner around your eyes instead.

It's as simple as that! Happy Haunting!!!!


 ForeverFall's creations welcome you to the realm for the strange and unusual. When she was a kid, she used to draw pictures of pumpkin towns where it was forever fall and the villagers celebrated this big on-going Halloween fest. With that in mind she creates items that could have been purchased at the markets in these make-believe towns. Hoping the experience that you may have in coming to her shop will reflect upon you in this same way. And that you too may feel like a child again, preparing for a spooky yet memorable evening of mischief and mayhem.

For more of ForeverFall on the web you can find her at …
Shop: www.etsy.com/shop/ForeverFall
Facebook: www.facebook.com/profile.php

Friday, August 26, 2011

Costume Ideas for the Seamstress in all of Us

EDT's Countdown To Halloween!

Thinking about Halloween costumes yet? You should be! Here's a couple patterns I, Static White, just listed with some suggestions to help you along.

Morpheus & Neo in Matrix Reloaded-
Neo's coat in the first movie was more a western style duster with a regular collar & 'V' insets on the shoulders. Morpheus' coat, if you want to be as accurate as possible, should be done in a black alligator skin-looking vinyl. But, that can be mighty pricey so you may just opt for a nice black vinyl.
The pattern suggests velcro closures. Bleh. If you prefer buttons, like I do, here's excellent instruction on how to do so here.


Sherlock Holmes, Van Helsing, Full Metal Alchemist, Uryƫ Ishida- My hubby thinks the coat on the left (blue) looks Van Helsing but it would need some tweaking with lots of buckles, straps, top stitching galore and the back reshaped and topstitched. If you want to get as close as possible to the movie costume, anyway! I think it would be an excellent beginning to a coat for an Uryƫ Ishida costume, from the anime Bleach, personally. It would also be a good start for a Full Metal Alchemist (another anime) military outfit.The coat on the right is obviously a Sherlock Holmes style. The pattern even includes the sleuth cap. But if you're good at playing with patterns it could be turned into an Alucard, of the Hellsing anime, coat by shortening and attaching the front edges of the cape to sleeves inner seam rather than have it come all the way to the center front.


Victorian travel/driving coats, Interview with a Vampire, Steampunk, Doctor Who-

This pattern is a basic men's Victorian driving coat and it includes a pattern for your lady! We know how cold it get's in October here in NA so this would be perfect to throw over your Lestat, Louis or any other Vampire Chronicles character. Louis & Lestat wear something similar in the first movie, if you want to get picky. And, of course, there's the every popular steampunk stylings. Are you a time traveling mad doctor? A Jules Verne type of adventurer? Well then, you need a coat, don't you? Shorten the coat to the knee, make it out of brown wool with no top stitching and guess what you have? The coat for Tom Baker's Doctor Who, that's what!


Civil War, Victorian/Steampunk, Firefly- Here we have Civil War North & South uniforms. Confederate is on the left and Union is on the right. I can not say if these are historically accurate for reenactment but I'm betting they'd be a good place to start if you're wanting to make your own.
This pattern is Victorian era regardless and can be used to get you going on some nice steampunk outfits too. Also, if you lengthen the one on the right to about the knee, stitch it up in brown suede, add wide leather cuffs (or faux if you prefer), don't forget the splits at the side seams aka gun flaps, and guess what you made? A Firefly Browncoat! The previous Victorian driving coat is also a good basis for a Firefly Browncoat.


For more of Static White on the web you can find her at …
etsy.com/shop/SWStitchery
etsy.com/shop/staticwhite
facebook.com/SWStitchery
StaticWhite.Blogspot.com
twitter.com/swstitchery


Friday, August 12, 2011

Elegant Halloween Party Invitations

EDT's Count Down To Halloween!
Halloween is almost here. And you have decided that you will throw a party that is going to be the talk of your whole neighborhood. You have picked your costume, your decorations, and the food you will be serving. Now it’s time to let your guests know so they can come. Oh my! You need to prepare the invitations!

Sure, you can go over to Martha Stewart’s web page, or to the craft store to buy some wonderfully awesome and creepy invitations… That most people will be using as well. Or, you can make your own and stand out of the crowd. This tutorial will be best suited for darkly elegant parties, with a hint of Victorian/past eras flair, more than for kid-oriented ones. We are striving for luxurious decadence and style.

Do you remember Francis Ford Coppola’s movie “Bram Stoker’s Dracula”? While traveling by train, Jonathan Harker is reading a letter sent by the Count:
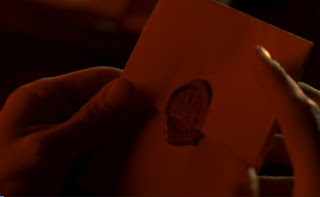
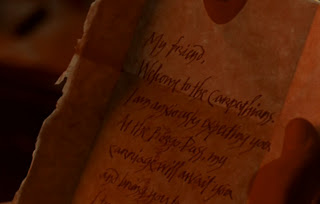


Our invitations are going to be similar to this letter.

Materials you will need:

Pic materials

- a computer and printer

- parchment paper

- scissors

- red sealing wax

- wax seal

- matches or lighter

First, buy the parchment paper. I love the Southword brand, and so did Abraham Lincoln! You have several available colors, but my favorite is gold. You can find it at most Staples stores. You’ll see that it has an amazing feeling to the touch, just like real hemp parchment. You won’t be using the whole lot for the set of invitations, but it’s an awesome paper to have for other projects (Harry Potter, anyone?) or to send letters.

Go to your computer and open a program to work with text. My favorite to use is Corel Draw, especially because we may add graphics later on. Adobe Illustrator may work as well. If you use Corel:

* open a new document

* choose the option “Landscape”

* we will use one page to make two invitations, so mark it in a way that you know how much space you can use – draw a line dividing it by half.
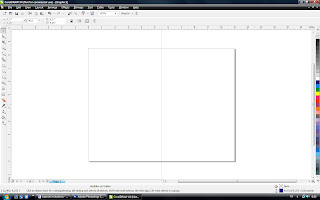


* Write your text. Try to use formal or semi-formal language, such as “You are cordially invited”, or “Mr and Mrs. (insert your last name) request the honor of your presence”. Don’t forget to include the date and place for the party. For the RSVP, I personally would include only a contact telephone. Telephones existed in the 19 century, but not e-mail, and we are going for antique feeling here. However, that is up to you.

* Choose a font that looks like hand writing. If you do not have one, just google “handwriting font” and you’ll find a bunch of them. I am very fond of Blackadder ITC. Adjust the size.

* Copy the text in the second half of the page. Click Arrange -> Align and distribute -> Align top.

* Center both texts to the page.

* Optional. You may want to add a crest or personal image to your invitations. A Celtic knot, a rampaging lion… Try not to use spiders, bats, ghosts or the typical Halloween imagery. We are going for the “Coat of Arms” look. As always, Google is your friend. Choose your image and save it as a JPG. Then click the Import button, and insert your image on the invitations. Adjust the image size and its position to the text.
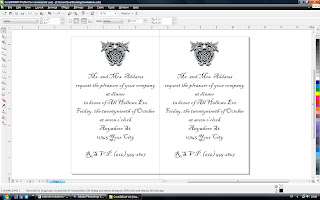


* Click File -> Print. A picture should come up saying: “Printer paper orientation does not match one or more document pages. Adjust printer automatically?” Click Yes. Click Print. You may want to do it first on a regular paper just to make sure everything is correct. Print as many invitations as you need.

Cut the page in half following the line you made.

Fold it in a way that there is no text showing. I like the method 1 better, but the method 2 is the same as to how Jonathan’s letter is fold:
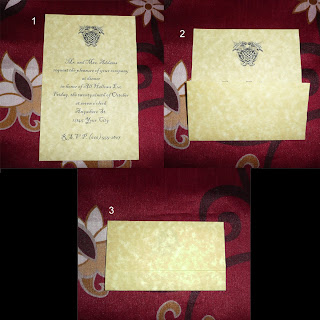
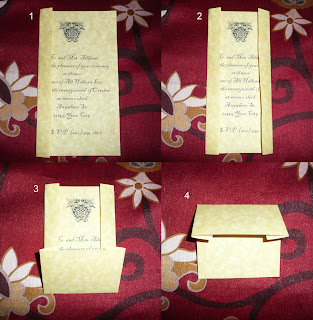


Then, get ready for the seals!
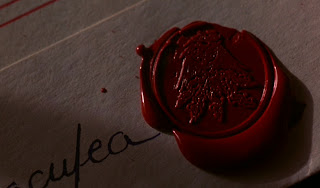


Next you will need sealing wax. You may buy it online, but they usually carry it at Michael’s stores in several colors (white, silver, gold…). My favorite is, of course, red, and goes perfectly well with this tutorial theme. To stamp the wax, you also need a wax seal. Also available at Michael’s, you have every letter of the alphabet to choose from, or you can pick a generic image. You have a wide selection of seals at Nostalgic Impressions.


*Disclaimer*

Be very careful during these steps! Be aware of risk of fire. Wax and papers can burn, and we would end up with a disaster instead of a nice party. Have someone nearby to help you, and a fire extinguisher just in case. Children should not use matches or lighters. You may want to try doing seals on regular paper a few times before doing it on your invitations.

Light the wick of a sealing wax stick and let the melting wax drip over your closed invitation. Be patient. It can take a little while for a good amount of wax to form on the paper. Blow out the flame when you have enough wax on your invitation, and put the stick aside on a non-flammable surface. Let the wax cool for a few seconds and stamp it with the wax seal. Wait 2-3 seconds before lifting it up. Let it cool. Repeat these steps for each invitation, one at a time.
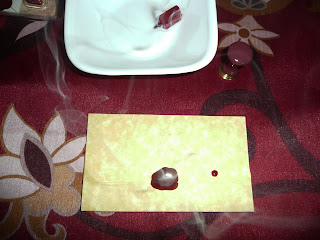
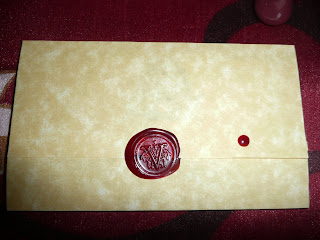


You can see a drip fell out of place, but personally it does not bother me; I honestly think that this add to the character of the invitation. Extra drops were likely to happen in antique documents. However, you just need to be extra careful when blowing out the flame on the wax stick or when you handle it to avoid this.

Optional. If you would rather not use fire, there are available stickers that look like wax seals. You can buy those instead, but be advised that these tend to be more expensive.

Deliver proudly your invitations and watch the surprised face of your guests. Surely they have never received such an invitation! You may do it in person, or use the also available parchment envelopes. If using the envelopes, place your wax seal outside, sealing the letter, instead of on the invitation.

Have fun at your party!

Kaleidoskopic Romance is a team of husband and wife and this is our little art project. We have always been fascinated with all things macabre, dark and unusual, especially Romantic Era writers as well as vampires and other night hounds. What we like most is to take an ordinary object and “gothificate” it.

For more of kaleidoskopicromance you can find them at...
Shop: kaleidoskopicromance.etsy.com
Blog: kaleidoskopicromance.blogspot.com

Friday, July 15, 2011

Braainnnnnssss Crochet Pattern- By: Fun and Fang

EDT's Count Down To Halloween!


Braainnnnnssss crochet pattern.

This cute but creepy brain, likes zombies...... for diner.
You can make him yourself by downloading this crochet pattern. It is easy to read and has clear pictures. The finished brain, will be a great party decoration or you can make him into a key chain and give him as a present to all of your friends.
Of course it is also the perfect decoration for Halloween! Put him into a little jar and he will help you scare everyone who visits your house. Click Here To Download Now


With funandfang, I try to combine weird with cuteness. I adore everything with fangs, so most things in my shop will have a fang or two in them. I mainly design crochet patterns, but I also make embroidery art and some spooky printables.
Blog: funandfang.blogspot.com
Etsy: etsy.com/shop/FunandFang
Facebook: facebook.com/pages/Funandfang

Friday, October 29, 2010

SCABS or BURNT FLESH

EDT’s Countdown to Halloween!
This tutorial is brought to you by DeviantMachine. Creator of the most adorable Pet Demon Bunny you have ever seen!


SCABS or BURNT FLESH

Supplies
1 box (4 packs) unflavored knox gelatin
Red & Black food coloring
Liquid latex
Small glass bowl
Disposable plastic utensil for stirring
Toothpick
Wax paper or plastic grocery bag to protect counter
Hot water

To get started...
Figure out where you are putting your scabs.
Clean and dry the area.
*You may want to shave the area, especially if it's the top of your arm. The latex and gelatin will pull the hair out!

Lay out your wax paper or grocery bag on your counter
Set out your other supplies: bowl, stirring utensil, toothpick, gelatin, food coloring, latex.
You can either microwave some water, or let the tap run til hot. It doesn't need to be boiling.


Pour 1 pack of gelatin into bowl. Add drops of hot water while stirring.
This is going to be about a 1:1 ratio. With so little water, it sets fast!

You want to get it to a sticky, chunky goo consistency.
Now you need to add your red food coloring, probably about 10 drops.
My bottle of black food coloring does not have the dropper top, so I use a toothpick to get a little to mix into the gelatin.

You want it to be chunky and look like a bowl of flesh!


At this point you have a couple options.
I have put it directly onto my skin, and I have let it dry before applying.
It all depends on if you have created any other prosthetics on your skin that you are using this for...such as open wounds made with fake skin and latex.
I'll say that for this, you are just applying it directly to your skin.


Take your blob of scab and lay it on your workspace. Flatten it out as much as you can. You want it to look like pulled off scabs.
Let it dry (hold it's shape). This will take anywhere from 30 min to an hour. (You can even make these a day ahead of time!)


Add a layer of liquid latex over desired area of skin...let dry.
Add another layer of liquid latex and set the dried scabs on it.
(*If you are allergic to latex, skip these steps!)
**You can also use wet gelatin to smear on your skin, and set the scabs on it to hold them in place.


You can paint around the scabs or add fake blood like I did for the picture.


You also have the option of making the scabs without the food coloring, and just painting over all of it.


The gelatin blobs also work great as chunks of flesh for hanging out of your mouth for a zombie costume!


When you're done for the night, just peel it all off.


Enjoy freaking people out!
HAPPY HALLOWEEN!!!


After years of being told she should sell her items, Rebecca started her own company in 2005, and her Etsy store in 2008. She does most of her business vending at clubs and conventions, but still enjoys having her Etsy store (How else would she meet all these awesome artists?!). Currently her items range from Creepy to Kawaii. She is mostly making hair accessories these days, and small plush creatures. Every now an then she gets that spark of inspiration to create something totally random.

For more on the web …
Website: http://www.etsy.com/shop/DeviantMachine
Myspace: http://www.myspace.com/deviant_machine_designs

Tuesday, October 26, 2010

Shrunken Apple Heads

EDT’s Countdown to Halloween!

This week the owner of Darkling Dreams the maker of the amazing Darkling Dolls is kind enough to show her her amazing technique for creating shrunken heads. I love this tutorial! There are just so many fun ideas you can make with this technique.

Shrunken Apple Heads: Who Doesn't Need a Little Shrunken Head Around the House?
I love making these sweet smelling and sometimes disturbing looking Halloween decorations! Every year I host a head shrinking party with the girls and we've come up with some tips and techniques you won't have seen anywhere else! First we will start with the basics:

Shrunken Apple Heads

supplies and ingredients:
apples~* salt
lemon juice
paring knife
vegetable peeler extras~whole cloves, potpourri, rice}*

~*You can use any variety of apple. I like to use a variety because they all dry differently so you'll get some different results. Granny Smith's are probably my favorite though.

Fill a large mixing bowl with cold water and give it a couple douses of lemon juice and a spoonful or two of salt. You're gonna ask me how much, aren't you? As any good witch would do, a pinch of this or that, use your instincts!

I like to use a vegetable peeler to peel the apples. Get as much from around the stem as you can, or core completely. Uncored apples tend to retain a little more moisture and have a more fleshy look, while cored apples will be harder and dry faster.

When you're ready to carve, use a small paring knife to cut into your apple. The vegetable peeler works great for eye holes. Remember that the apple is going to wither and shrink, so you want to exaggerate features! You also don't need to get too detailed. General shapes are great and simple details are best, a shallow line can make great wrinkles as it shrinks.

When your done carving plop your apple into the water mixture to soak for about 5-10 mins. After that you can add extras like whole cloves for eyes, or even Frankenstein bolts! They have a natural x-shape at the top, how convenient! Also rice, brown or white, make great teeth. Insert them before drying your apple, they add 100+ to the creepy factor. Another new and fabulous trick is to add potpourri pieces to your apple. They make great ears, teeth, and tongues!

Now it's time to be patient. They need to dry out and it can take anywhere from 1-2 weeks in a dry place. If they are left somewhere humid, you risk them turning into little moldy heads. Freaky, but not in the good way ;) You can keep them on a baking sheet in the oven. Open the door a few times a day just to let some air circulate in there. You can even turn the oven on to help them along. Turn the oven on periodically to the lowest possible heat (170 degrees for me) for an hour or so and then just turn the oven off and leave the door closed. That will help to shrink them much faster. If you live in a humid area, you may just want to leave them in the oven with the oven turned on to the lowest temp for a couple of days.

I like the fast way! If they are completely cored, they can be put in the oven around 200 degrees and be done in about 6-8 hours!

Extra Tips~***

I put mine on a wire rack above the cookie sheet, and rotate every couple of hours so gravity doesn't flatten them too much on one side, of course that can also be used to your advantage!

If you don't soak them in the water mixture they will dry darker.

Paper towels work like sandpaper on the raw apple and are an incredibly helpful carving tool


So what do you do with creepy little apple heads? Make a centerpiece, totem pole, put them on candle holders, but most definitely embellish them!! Make dolls with them, add google eyes, hair, moustache, yarn, stitching, even piercings! Everyone will want to know what the crap you have on your table is and they'll think you're awesome when you tell them they're little gnomes you found in your basement and then performed an ancient ritual on! ;)

You can see many of the techniques and tips used in the pictures of my precious heads! Have fun being head hunters, and Happy Halloween!!


Darkling Dreams is Handmade Art Dolls, Mixed Media Art, Housewares, Steampunk, PMC Jewelry, Altered Art, Photography, Chainmaille, and Sock Monkeys. Or anything else we might scream into creation, with a Gothic, or Punk vibe.

For more on the web you can find her at …
Shop:http://www.etsy.com/shop/darklingdoll
Blog: http://www.keyholegallery.blogspot.com/
Facebook:http://www.facebook.com/pages/Teresa-Taylor/104054012963823#!/profile.php?id=100000770844737&v=wall

Saturday, October 16, 2010

The Ultimate Zombie Makeup Tutorial

EDT's Count Down To Halloween!
Specializing in everything from album covers, to t-shirt designs, and even hand painted art mannequin heads this artist does it all. As well as gives us an amazing tutorial on zombie makeup. I personally can't wait to try this out.


The Ultimate Zombie Makeup Tutorial
1) Create a base coat of white using white tube Halloween make up. Covering the ears and neck as well.(to create a realistic coat)
- Don't use too much, use only a thin coat of white, leaving a little flesh showing through.


2) Outline all creases and check bones with black eyeliner(black lipstick for darker low lights)
-This builds the map for blending .
- Take your index finger and following the contour of your cheek bones and temples smudge the black
downward to make a gradient dark to light gray.Making the line vanish in the blend.


3) Using Silver, Grey, Green, Blue or Purple eye shadow. and either your finger or cosmetic sponge. Use a thing "dose" of your color choice, take
that color over the smudged black and blend down along the contour of your gradient black until desired "bruising" is achieved.


4)With the black lipstick, put only a thin line on the lips to give it the gray lip look.


5) With your finger or sponge, put a very small amount of black lipstick on then follow the eye socket(spreads easier than eyeliner).
- Using the color choice for temple and cheek bones, Blend over the black inward to create depth..and color.


6) Add blood and have fun.

Blood recipe:
Warning..This stuff gets MESSY!
1- Bottle of Karyo Syrup(Clear)
-Pour out a 1/4th of the bottle to create room for the rest of the ingredients.
1-Packet of Black Cherry Koolaid
4-Teaspoons of Chocolate powder, or Chocolate syrup
Use as much as you want of Strawberry jelly to add chunkiness,
Put water in to mix and slightly break down the sugar contents.
Then SHAKE until mixed fully.

Alternative to the chocolate: Use dark kayro, or maple.
The bad thing about maple is it smells horrible, and tastes just as bad.
The good thing about maple: It's more stringy/cartoony looking, and sticker
for a more grotesque look. And has a great color to it.
All forms though, if you get it on your clothes and don't immediately wash
It will harden, into a plastic like state, and will cause plastic like breakage
in said clothing.
There you have it...Instant Zombie, by ZMB Graphics.
Add water to fill the bottle..then SHAKE until mixed fully.


Zmbgraphics specialize in original/customized fine art, illustration, and graphic design. Not limited to and including: Album covers, T-shirt designs, banner design, business card design, sticker/button/and patch design. As well as portraits, custom work of any kind. If it can be drawn, zmbgraphics will do it.

http://www.facebook.com/zmbgraphix
http://www.myspace.com/zmbgraphics
http://www.zmbgraphics.deviantart.com
http://www.etsy.com/shop/zmbgraphics

Friday, October 8, 2010

Halloween Tree

EDT's Count Down To Halloween!
This little gem is brought to you by the reigning empress of shadow boxes herself, Nacreous Alchemy. Hers is an amazing little web store filled with all kinds of delectable goodies to tempt you. My favorite item she makes has to be her Cemetery Tableau Box . Today she is kind enough to share her talent with all of you. Please enjoy her journey in making a Halloween tree.


Even though I’m a huge fan of Halloween dĂ©cor I’ve never created a Halloween tree. I was inspired this year to try my hand at it. The fun thing about this project is it can be as simple or as intricate as you want to make it. I kept mine on the sleek and simple side.

To start I bought a bare branch with a few leaves at the craft store and then I went out into the yard and gathered some real branches to mix in. I left them their natural color but if you really want to go all goth you could paint them black. I bought a small glass vase to hold the tree and to keep it in place I found a bag of glass stones mixed with ghosts and bats. If you can’t find the stones a mix of black and orange sand would also look great. For decoration I just gathered up small items I had around the house and picked up a few inexpensive items from the Halloween bins.

I filled the vase with the glass pieces and arranged the branches. And then the fun part I used rubber rats, skeletons, and spiders as well as styrofoam eyeballs and spider webbing. The nice thing about the styrofoam eyeballs they just stick right on the ends of the branch for an eerie alien plant look. I hung the skeleton and one of the rats with some thin twine and draped the spider webs around the branches and filled in with a few spiders and remaining rat. As the last touch I tied some Halloween ribbon around the vase. Once it’s finished you have a great center piece for a Halloween table or you can make a set to flank a fireplace. Let your creativity run wild and have fun with it!

Nacreous Alchemy features gothic art, shadow boxes and home décor. You can find anything from Victorian Gothic, dark fairy tale, classic horror, and understated dark elegance to add that perfect touch of shimmery darkness to any surroundings.

Find Nacreous Alchemy online at:
Web Store: http://www.etsy.com/shop/NacreousAlchemy
Face Book: www.facebook.com/NacreousAlchemy
Blog: http://nacreousalchemy.blogspot.com/

Friday, October 1, 2010

Costume Ideas

EDT's Count Down To Halloween!

This week on the Etsy Dark Forums, as one can imagine, there has been a lot of talk about Halloween costumes. I noticed that Foreverfall, the maker of some of the most amazing art dolls you have ever seen, came up with a ton of really good ideas just off the top of her head. I collected them her to share with everyone.


Here are just a few of the Halloween costume ideas I've been thinking about lately...

Carnival Sideshow Theme...Lobster-claw sideshow performer- Just cut a hole in the crotch of some panty hose and put your head through it and wear the leg parts as sleeves (don't cut the feet out, or just cut a small hole for your thumbs.) It will give the illusion that you have lobster clawed hands.

Or, you could go as a tattooed lady and just go to town on your face with some face paint.

You could also go as a fortune teller and hand out fortune cards like the ones they used to have in those machines (You can always make up your own fortunes and print them off on sheets of business cards on your printer).

Some other ideas are...
Burnt Buddy Holly: Dress up like Buddy Holly (Thick framed glasses, suit- preferably from a second-hand store , skinny tie, slicked pompadour hair and a cheapo yard sale guitar, if you can find one). Paint half your face like it is burnt with face paint. Add tears to half of your suit (on the same side as your face burns), and then use burnt coloured acrylic paints such as reds and browns to paint parts of the torn half of your suit to look like it's been burned or singed. You can water down the paint to make it thinner for the singed look. You can also get some orange and red cellophane from your local craft store and cut pieces to look like flames. Attach these to the shoulders of your suit jacket with super glue or a hot glue gun.

The Hermit: This is a simple, but recognizable costume. To go as the character that is depicted in tarot cards and who also made an appearance on the cover of one of Led Zepplin's albums. Wear a big black cloak with a hood (black worn out clothes underneath) and carry a lantern. Voila!

Fruit Bat: Make a simple tunic out of faux fur from your local fabric store (about 2-2 1/2 yrds should do). Wear black leggings and a black, long sleeved shirt underneath. Attach a line of velcro to the underside of your sleeves (the part that touches your sides when your arms are relaxed at your sides.)

You can make simple wings mom-styled by cutting an obtuse triangle shape out of black fabric or a couple of black slips. Make sure the bottom (the longest side of the triangle) is slightly rounded. Then scallop around the rounded edge of the rounded side. Make two of these. Sew one of the flat sides of one of the triangles to the side of your faux fur tunic just below the armpit. Then do the same with the other triangle to the other side of your tunic. Add the other half of the velcro strips (from the ones that you attached to your sleeves) to the other flat side of the triangles. Once your whole outfit is on, you can velcro your wings and your sleeves together so that when you outstretch your arms, people can see your wings.

Make a necklace out of fake fruit and string found at your local craft store.

To make ears, get a simple black head band and some tan fleece. Cut four large Spock or elf-shaped ear pieces out of the fleece. Sew two together pieces together. Then turn inside out. Do the same with the other two pieces. Then sew them to the head band.

ForeverFall's creations welcome you to the realm for the strange and unusual. When she was a kid, she used to draw pictures of pumpkin towns where it was forever fall and the villagers celebrated this big on-going Halloween fest. With that in mind she creates items that could have been purchased at the markets in these make-believe towns. Hoping the experience that you may have in coming to her shop will reflect upon you in this same way. And that you too may feel like a child again, preparing for a spooky yet memorable evening of mischief and mayhem.

For more of ForeverFall on the web you can find her at …
Shop: www.etsy.com/shop/ForeverFall
Facebook: www.facebook.com/profile.php

Friday, September 24, 2010

How to Make a Gravestone Rubbing

EDT’s Countdown to Halloween!

Temple or gravestone rubbing is believed to have originated with the Chinese, around 30 0 B.C. Originally, it was used as a method of communicating governmental decrees, a forerunner to the printing press. The government’s laws and messages were carved in stone then transformed to parchment by rubbing with colored wax or other permanent dye material. More recently gravestone and momument rubbings were once very popular, and a common field trip activity for schoolchildren. For me they are just really, really cool to frame and put in your living room, especially for Halloween. There are much more complex methods for achieveing a proper gravestone rubbing, but this one makes a great image and easy to do.

Things You'll Need:
• Conte crayon, or pastel
• Drawing Pencils
• Pencil Sharpeners
• Tracing Paper
• Crayons
• Masking or Painters Tape

- Remember to always be respectful in a cemetery. Always check with the proper authorities before attempting any type of rubbing activity, regardless of whether the object is on private, or public properity. If you are going to do rubbings on actual headstones or monuments, be sure to check the laws in your state before you start. In many states, like New England, it is against the law to make rubbings on gravestones. In the UK, there are centres set up specifically for making rubbings, using replicas of the original monuments and plaques. Always best to do a little research before you start to avoid getting anyone upset.

- This method will work only on gravestones that have raised or sunken letters. If you can't feel anything when you rub your fingers across them, they won't show up on a tracing.

-Hold the tracing paper over the front of the stone or marker. You may want to use masking tape to prevent your paper from moving.

- The trick to this is finding the right drawing implement that woks best for you. Try out your technique at home first, and practice a little bit. If you're using a pencil of any kind, hold it almost horizontal against the paper as you rub. If you're using a conte crayon or pastel, rest it flat against the paper. Pressing gently, rub over the image until an outline starts to appear.

-Usually, the image will not turn out completely crisp. You might want to go back in and alter it a little bit. If you're using a pencil, you can use your kneaded rubber eraser to remove shading in small areas, and create a more distinct image. Also you can move the rubbing while you’re working on it slightly to create a 3D effect. Complete the rubbing in the basic color then move the paper slightly to one side. The next step is to go over the highlights with a contrasting color giving the image a highlight or 3-D effect.

- Roll up your rubbing carefully, and when you get home spray it with a spray fixative to make sure it is protected ( make sure to do any alteration to the image before using the fixative). And there you have it a perfectly spooky image for framing.